THE QUICK AND EASY GUIDE ON HOW TO PLAN A LAYOVER: How to Get the Best Out of Your Layover For Beginners

Psst… Want to see a new country without spending hundreds of dollars on flight tickets? One of the simplest travel hacks to see a new country without paying an extra cent is … *drumroll* layovers!
That’s right: by adding an extra stop into your flight itinerary, you can actually save money and get more out of your vacation.
My first experience with a layover was on a trip to Nepal, where I had the opportunity to spend 9 hours in Hong Kong on the way to Nepal and another 13 hours on the way back to San Francisco. I got to try some of the best dim sum and boba tea in Asia, climb up to Victoria’s Peak, and meet one of my (now) best friends thanks to a Couchsurfing meetup — and none of this would have happened if I booked a direct flight or a flight with a short layover!
Besides Hong Kong, I also got to see countries that I normally wouldn’t have otherwise been able to fit onto my trip. Some of my other layovers were through Sydney, Australia (9 hours); Dubai, UAE (7 hours); Amsterdam, Netherlands (12 hours); and Kiev, Ukraine (too many to count ![]() ).
).
Thanks to layovers, you can see a new country or city for free – and I’m here to show you how. Planning a layover is simple if you follow these easy steps. I’ll tell you everything you need to know, such as which airlines are best for layovers, how to fly with layovers, how to deal with luggage/hotels, and even a few flight tickets hacks.
Let’s check it out!
Before we can dive into planning and booking a layover, let’s go over a few things:
AN INTRODUCTION TO LAYOVERS

What you need to know about layovers
The more you fly, the easier it’ll get. This might sound condescending, but I promise you it’s not! The more you look through different ways to get to your destination, the more you’ll realize how many different variants you have for flights, cities, and layovers. Let’s take a look at one easy example:
Let’s pretend I need to get from one major city in the United States (San Francisco) to another major city in Russia (Moscow). I type in my two points in a flight search engine and get these options…
- A layover in Amsterdam (AMS) if I book through KLM Airlines
- A layover in Paris (CDG) if I book through Air France
- A layover in Istanbul (IST) if I book through Turkish Airlines
- A layover in Helsinki (HEL) if I book through Finnish Airlines
And so on. There are about a dozen different ways to travel from point A to point B and see an extra country in between. The world truly is your oyster!
Layover Airports
There are a few caveats, however: most layovers will be through major cities (not through a charming little village airport in Tuscany, sorry!) that are headquarters for airlines.
Here’s an easy reference list of airlines and their usual layover airports/cities. Note that some airlines have more than one city!
-Toronto, Montreal, Vancouver (Air Canada)
-Paris (Air France)
-Reykjavik (Iceland Air)
-London (British Airways)
-Lisbon or Porto (TAP Portugal)
-Amsterdam (KLM)
-Frankfurt (Lufthansa)
-Zurich (SWISS Airlines)
-Istanbul (Turkish Airlines)
-Dubai (Emirates)
-Doha (Qatar)
-Singapore (Singapore Airlines)
-Hong Kong (Cathay Airlines & Hong Kong Airlines)
-Tokyo (JAL Japan Airlines)
-Sydney (Qantas)
Where to Book Layovers
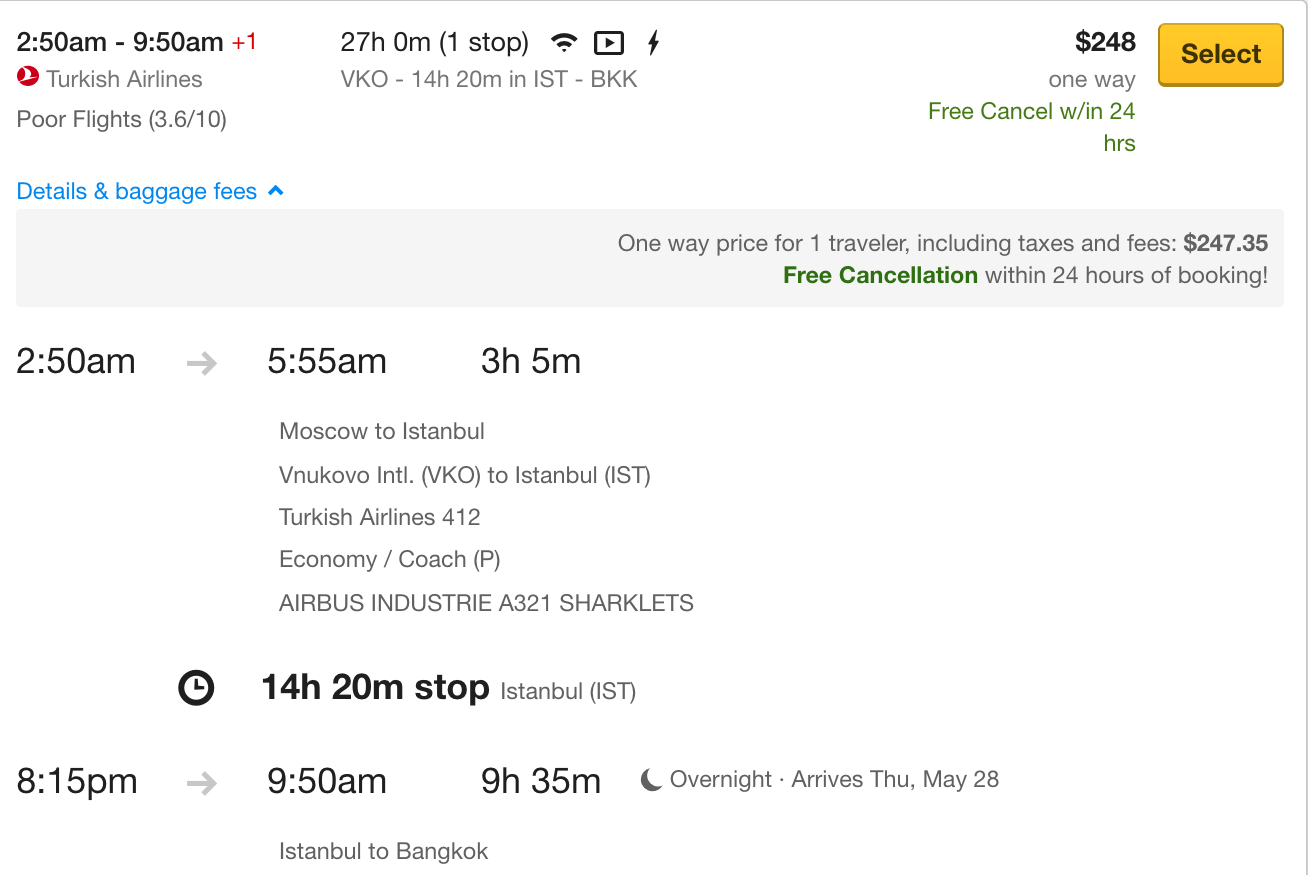
You can book layovers on almost any airline ticket booking website – the secret is to look for long layovers. In the example above, you can see in the bold text that there’s a 14.5 hour layover in Istanbul. By the way, this is an example of the perfect layover: you’ll be arriving in your layover country (Istanbul, Turkey) in the morning at 6am, and by the time you make it to the city, it’ll be around 7am and you’ll be ready to explore the city. It gives you about 11 hours to see Istanbul, and leaves at a great time (8:15pm), when most businesses are closing down. Finally, you’ll arrive in Bangkok around 10am, well rested and ready to start your vacation! ;)
Like I mentioned, there are so many airline booking website. The following are my favorite because of their convenience, easy to read website layout, and competitive prices:
Expedia – Easy to use, clearly shows all of the flight info (and baggage fees!), and is one of the most popular airline ticket websites
Momondo – Often shows budget airlines that other flight aggregators miss
Skyscanner – My favorite website and where I usually start; check out the ‘Everywhere’ option if you have no clear destination in mind and want to see what’s available
Layover vs stopover: What’s the Difference?
You might have heard the word stopover being used when talking about a flight, but this is different than a layover!
A stopover is a 24 hours or more layover where you leave the airport and explore a new city.
A layover is under 24 hours and doesn’t necessarily mean that you will leave the airport. For example, you might not have enough time to explore the city (especially if your layover is only an hour!) or you might not have the proper visa. But we’ll get into that later.
Ready to plan your layover? Let’s take it step by step!
—
HOW TO PLAN A LAYOVER

Step 1 – Plan Carefully
Planning a layover is one of my favorite things to do, but there are some considerations to keep in mind.
First of all, make sure you have enough time to enjoy your layover. I normally recommend that a layover is a minimum of 7 or 8 hours so that you can properly explore the city, get transportation to/from the airport, and have enough time to pass through security. The easiest way to find out how much time you need is to do a quick Google search or check the Tripadvisor forums, since some cities have different minimum layover times than others!
For Example… To get from Oslo airport to the center takes 20 via Express train. If you had a layover in Paris, it would take you 50 minutes to get to the center via RER train.
Speaking of time, check that your layover is during normal hours! There’s nothing worse than landing in a city only to realize that it’s 2 AM, the public transportation isn’t working, and there’s nothing to do. It’s best to land at your layover destination anytime between 7 AM to 2 PM so you can explore the city when its light outside.
Finally, make sure you have the proper visa. In most situations, you won’t need a visa for your layover, but it never hurts to double check. I’ve had friends who were stuck in Sydney airport because they didn’t have an e-visa (it only takes 20 minutes to apply online!) and friends who were turned back at the Canadian border because they didn’t have a transit visa. Uncle Google is your friend. :)
—

Step 2 – Transportation
Now that we have the logistics down, it’s time to plan transportation!
Most major metropolitan cities will usually have a few different ways to get from an airport to the city center. Here are just a few ideas:
-Regular buses
-Airport buses
-Metro (Hong Kong’s MTR metro is one of the best)
-Trains (Like San Francisco’s BART)
-Airport Shuttles (like this one from Iceland’s Keflavik airport)
-Private Transfers (Like this one from Istanbul)
-Taxi and Uber
Public transportation will usually be your best option if you’d like your layover to be budget-friendly. If you want to get to the city quicker and prefer not to deal with the (sometimes confusing) public transport, then an airport bus, shuttle, or taxi is a better choice.
—

Step 3 – Luggage
Unless you travel with just a passport, wallet, and the clothes on your back, chances are you’re probably stuck with some luggage. No worries – let’s take care of that as well!
One of my biggest nightmares for my layover in Sydney was that I would have to drag my 30-pound suitcase everywhere I went (those were the days before I switched to a carry-on!), but thankfully one of my friends told me about luggage storage.
I’m willing to bet $5 that every major airport has at least one luggage storage facility. You simply show up, pay the fee (per bag), and have your luggage stored until you come back to pick it up. The majority of baggage storage facilities have an attendant so you can travel assured knowing that there’s someone watching your stuff.
However, there’s also another travel hack that I often use to store my luggage. Keep reading to find out ;)
—

Step 4 – Accommodations
Whaaat, why would you need a hotel on a layover? Isn’t that a waste of money?
Nope! Hear me out and I might be able to change your mind :)
Even if your layover is only a few hours long and during the daytime, sometimes it’s worth it to book a room. There are two big benefits to this: one, you’ll have a place to store your luggage and two, you have a nice home base to relax, take a break, and freshen up!
During my twenty or so layovers in Kiev, I’ve had a handful of times when my plane arrived at 8 AM and my next flight wasn’t until 8 PM in the evening. Kiev airport isn’t that interesting to spend 12 hours in, so I go out and explore.
Here are three ways you can book a hotel room for cheap:
BOOKING & AIRBNB
A few weeks before my trip, I go onto Booking to find hotel or hostel rooms. I set my filter to find rooms in the center, with a rating of 7+ higher, and then filter by price – Voila! I can usually get a room to myself for around $20. If you have a long layover, sometimes this trick is cheaper than paying for luggage storage.
If there’s nothing good on Booking, AirBnB is my second choice. There are plenty of budget-friendly private rooms.
TIP: AirBnB hosts are usually more flexible with check-in times and they might give you a few local places to check out!
DAY RATE HOTELS
Likewise, many hotels have this thing called a day rate, where travelers check into the hotel at a certain time (for example, 10 AM) and check out by a certain time (4 or 5 PM) and get a deeply discounted rate. Business travelers usually take advantage of this “travel hack,” but you can too! There’s a website called HotelsByDay that gives you a list of hotels that have day rates and the ability to book them.
LAST MINUTE DEALS
Finally, if you like to live on the edge, you can take a chance and get up to 80% off rooms through the Hotel Tonight app. When hotels have unsold rooms that they want to fill up, they advertise on HT so that smart travelers (like you!) can get a good deal. I’ve used this app on a last-minute reroute to Las Vegas and was pleasantly surprised at how quick and cheap it was to book a room.
If you’re a new member, you can use code LBERDNYK to get $25 off. :)
—

Step 5 – Finding Things to do and Creating an Itinerary
Last but not least, it’s time to put it all together and create your plan! This is my favorite part of planning because you can go wild and pick the most interesting attractions, restaurants, things to do, and more.
I recommend starting very broadly by doing a basic search for “What to do in X City” and going from there. I like to comb through Tripadvisor and especially their country- and city-specific forums, where there is a ton of information on anything from SIM cards to which ferry to take.
Some of my other favorite sources of information are blog posts (wink wink ![]() ), Pinterest, and Instagram (especially if you’re a visual person like me!)
), Pinterest, and Instagram (especially if you’re a visual person like me!)
When you have enough information create a Google Spreadsheet or Google Doc to keep your notes and links to potential hotels, restaurants, activity or tours, and so on. Plus you can save it for offline and use it for reference on your layover!
—
Step 6 – …Or Just Join a Tour
If you don’t have time to plan a layover or you prefer to have someone else show you around (like a local!), there are plenty of options.
Back when I planned my first layover, I was lucky enough to meet one of my (now) best friends through Couchsurfing. I put up a notice saying that I would be in Hong Kong on a layover and would love to meet some locals, my friend replied, and voila! I got to go to so many cool local places that I would have never known about if I didn’t meet my friend – or if I just followed the advice on Tripadvisor or a similar site.
If you prefer more structure, you can also book a group walking tour or private tour through websites like GetYourGuide, Viator, or KKDay. I’ve used all three and have only positive things to say about them. One of my favorite tours was when I had a private guided tour through Amsterdam and got to see the entire city in under 12 hours!
—

Step 7 – Book Your Ticket!
Perhaps the most important step is finally booking your ticket ![]()
Once you’ve found a suitable ticket that ticks off all your requirements, it’s time to find the best price. I like to start researching tickets with layovers through Google Flights and then finding the lowest price on either SkyScanner, CheapOair, or Expedia.
—
That’s all there is to it! Which layover will you book next? Or which layover cities have you done before? I’d love to know – tell me all about your layover adventures in the comments below, and see you next time!
—
On my way to Vietnam I had a 10 hour layover in Beijing which was perfect for a little bit of exploring. It’s the first time I’ve had a substantial layover (long enough to leave the airport) and it was planned on purpose for my friend who’d never visited China. I definitely want to plan more trips like this but knowing how to is the key, so this is a really helpful guide
These are helpful tips! I enjoy my layovers by going to the airport lounges and enjoying some bubbly and food! :)
I have never thought about layover travel until now! What great trips. Makes me think twice about how I will utilise my time from now on!
I typically NEVER aim for a layover, rest aside a stopover! but your post makes me rethink my booking strategy…